Hey there, fellow laptop aficionado! Ever found yourself in a situation where capturing what’s on your laptop screen is an absolute must? Whether it’s nailing that hilarious meme, preserving an inspiring quote, or saving a vital piece of information, learning to take screenshots on your laptop is like having a superpower! Fear not, for I’ve got your back, and I’ll show you how to unleash your screenshot prowess effortlessly. Let’s dive right in!
1. Mastering the Classics: Keyboard Shortcuts
Picture this: you stumble upon a mesmerizing landscape, and the urge to screenshot it strikes you like lightning! The quickest way to capture your screen in all its glory is by summoning the classic keyboard shortcuts.
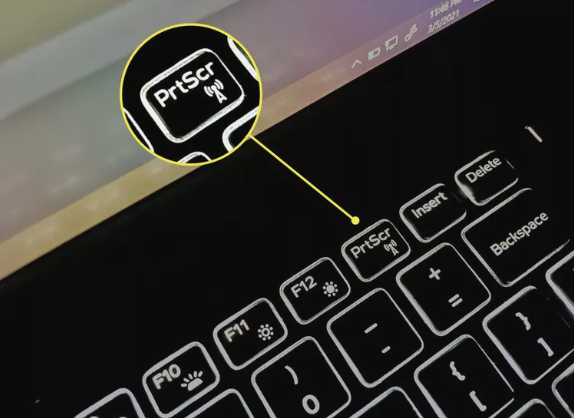
Print Screen or Prt Sc: Tap this magical key to capture your entire screen instantly. The screenshot will be copied to your clipboard, waiting for you to paste it into any app of your choice. Abracadabra!
Alt + PrtScn: Need to capture only the active window? No worries! Press this spellbinding combo, and voilà! The screenshot of the window will be whisked away to your clipboard, ready to be shared with the world.
2. Unleashing the Snipping Wizardry
Who says magic has to be limited to just full-screen or a single window? Enter the Snipping Tool, your loyal wizard companion that allows you to select and edit a specific area to capture.
Find Your Wizard: Seek out the Snipping Tool by typing “snip” in the Windows search box. Once you’ve discovered it, unleash its power by clicking “New” to begin your spellbinding capture.
Choose Your Area: Hover your cursor like a skilled wizard’s wand to the area you wish to screenshot. Draw a magical boundary around it, and presto! Your desired region is captured!
Save Your Spell: Having successfully cast your snipping spell, click the “Save Snip” icon to preserve your captured image in PNG or JPEG format. Abracadabra, your masterpiece is ready!
3. Embracing the Magic of Snagit
Are you ready to level up your screenshot game with enchanting image editing and sharing abilities? Snagit, the sorcerer’s apprentice of screenshot programs, is here to make your wishes come true!
Summon Snagit: Begin your journey by downloading and installing Snagit. This reliable sorcerer’s apprentice is just a click away from being at your service.
Capture the Magic: Hover over your desired area like a seasoned conjurer, and Snagit’s wizardry will automatically detect and select it for you. With a flick of your mouse, capture the magic!
Edit with Sorcery: Step into the Snagit Editor, where you’ll find a treasure trove of enchanting editing tools. Add mystical shapes, text, or effects to your screenshots—creating true wizardry.
Share Your Wizardry: Don your wizard’s robe and share your magical creation with the world! Click the “Share” button to cast your screenshot spell far and wide.
Remember, dear reader, whether you choose the classic keyboard shortcuts, unleash the Snipping Tool’s power, or embrace Snagit’s sorcery, taking screenshots on your laptop is now your superpower. Your journey to becoming a screenshot sorcerer has just begun, so practice these tricks and soon you’ll be capturing your laptop screen like a pro! Now, go forth and let the magic unfold!
Read more:
FAQs:
1. What is the screenshot key on a laptop?
The screenshot key on most laptops is commonly known as the “Print Screen” or “Prt Sc” key. It is usually located in the top row of the keyboard, alongside other function keys. On some laptops, you may find it as a secondary function, requiring you to use it in combination with the “Fn” key.
2. What is the best way to take a screenshot on a PC?
Taking a screenshot on a PC, including laptops, is a breeze. Here’s how:
a) Capture the Entire Screen:
Press the “Print Screen” or “PrtSc” key. Your screen will be instantly captured, and the screenshot will be saved to the clipboard. To access it, open an image editor or any application, such as Paint or Word, and press “Ctrl + V” to paste the screenshot.
b) Capture the Active Window:
To capture only the active window, press “Alt + Print Screen” or “Alt + PrtSc.” The screenshot of the currently active window will be copied to the clipboard, and you can paste it into an application just like with the full-screen capture.
3. How do I take a screenshot on my laptop with the Shift key?
The Shift key itself is not directly involved in capturing screenshots on a laptop. The standard methods, as mentioned earlier, use the “Print Screen,” “PrtSc,” and “Alt + PrtSc” keys. However, some third-party applications may offer additional features, including using the Shift key in combination with other shortcuts for specific purposes.
4. How do I take a screenshot on my laptop without using the shortcut key?
If you prefer not to use keyboard shortcuts, fear not! Windows laptops provide an alternative method using the “Snipping Tool” or the “Snip & Sketch” tool, depending on your Windows version. Follow these steps:
a) Snipping Tool:
Type “Snipping Tool” in the Windows search box and open the application.
Start capturing by clicking “New” in the Snipping Tool window.
You can capture an area by dragging the cursor around.
Choose a location and format for the screenshot and save it.
b) Snip & Sketch:
Snip & Sketch can be directly opened by pressing “Windows + Shift + S”.
Choose the type of snip you want (rectangular, freeform, window, or full-screen).
Drag the cursor to capture the area you desire.
The captured snip will be copied to the clipboard and saved automatically.
There you have it! You’re now equipped with multiple ways to take screenshots on your laptop. Whether it’s using the classic keyboard shortcuts or the built-in Snipping Tools, capturing your screen has never been easier. So, go ahead and immortalize those precious moments on your laptop with a click!

